
As mobile applications become more and more prevalent, so does the need for customizing the user experience. React Native is a popular open-source framework that allows developers to create native apps for both iOS and Android with a single codebase. This is why developers of React Native app development company are in huge demand. One way to make your app stand out is by customizing the top tab navigator in React Native. In this blog, we’ll explore how you can take advantage of this powerful feature to create a unique user experience for your app.
What is app customization?
App customization is referred to as the personalization of the app using which you can develop your app in a unique way to meet the requirements of your target audience. Apart from adding the relevant components, you can play with props to blend in the customization.
Now we will start building up the interface of the top tab navigation.
Environment configuration for the React Native
This is the first step for every developer who is starting with their first React Native project. This step comprises the installation of software and SDKs required for the React Native project development. Before the setup configuration, you should choose the React Native tool with which you want to work with. There are two types of React Native tools namely Expo CLI and React Native CLI. The setup process varies based on the selection of the tools.
For the current project, I will choose the React Native CLI tool. If you want to consider the same development tool then you have to download Android Studio and install it. Besides, you have to install JDK, Node, React Native CLI, and any IDE. I would recommend you go for the Visual Studio Code editor.
For further assistance, visit the linked article.
Creating a template or folder
For every project, you need a template in which you can add the codebase and install the third-party libraries if needed.
So, let’s see how you can build a template.
- Consider a folder in your dev system. You can create one in any of the drives in your system.
- Open the cmd from that folder.
- Run npx react-native init Toptabnavigator –version 0.68.1 on the cmd.
- Hit the enter key and you are done.
Note that your template will be built with the name Toptabnavigator and 0.68.1 is the React Native version you will be developing with.
Third-party setup configuration
For the top tab navigator, we need two components: NavigationContainer and createMaterialTopTabNavigator which are not available in the native React libraries. So, you have to install two libraries namely @react-navigation/material-top-tabs and @react-navigation/native.
For its installation, create a terminal from your template (here it will be from Toptabnavigator). Then, run npm i @react-navigation/material-top-tabs on the terminal. Also, for @react-navigation/native, you need to pass the command line npm i @react-navigation/native on the same terminal.
The components taken from these third-party libraries are quite helpful as you can easily cut off the need for code repetitiveness.
Creating the .js files for the project
Here, you have to work on five different files namely Home.js, About.js, Setting.js, Material.js, and App.js. Among these, the first three files are for creating three screens (Home screen, About screen, and Setting screen).
Let’s check how you can build all these five files.
First, create a ‘Component’ folder in your project and then add three files named Home.js, About.js, and Setting.js in it.
Creating codes for the Home.js file
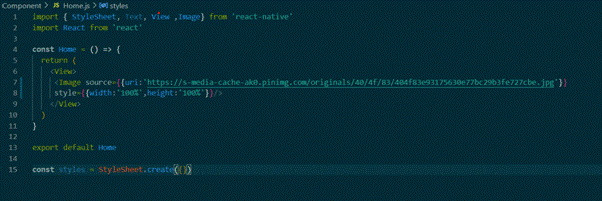
Image 1
For the Home screen, consider the snippet shown in image 1. Here, what the code is doing is importing all the required components. Then it defines the main component Home under which it adds an Image with a definite source and some styling parameters.
Next comes the Setting screen.
Creating codes for the Setting.js file
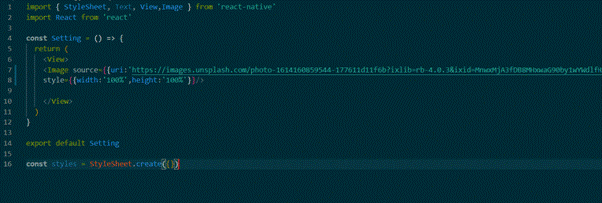
Image 2
This is another screen that will be rendered on the tab navigator at the top. Consider the codebase shown in image 2 for the Setting.js file.
This is the same as that of the Home.js file. However, you have to ensure that you change the image source and add the Setting component as in lines 4 and 14 of image 2.
Creating codes for the About.js file
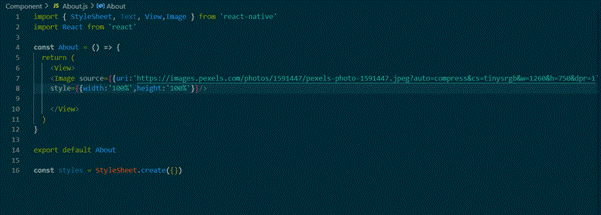
Image 3
This is the last screen that I have created for my project. Consider the code snippet shown in image 3. Only change the Image source in the component name ‘About’ in lines 14 and 4.
If you want, you can add more screens similar to the way shown in the Home.js file, About.js file, and Setting.js file.
Creating the Material.js file
For the Material.js file, you have to import the components as shown in image 4.

Image 4
Besides the core components, the createMaterialTopTabNavigator component is taken from the @react-navigation/material-top-tabs. Also, import the three screens that you have created in the previous sections. As you can see, the code imports Home, About, and Setting from ./Component/Home, ./Component/About, and ./Component/Setting respectively.

Image 5
Now, as shown in image 5, the code imports the Material function and uses the createMaterialTopTabNavigator as a function.
It creates the Tab Navigator with the screenOptions object added to it.
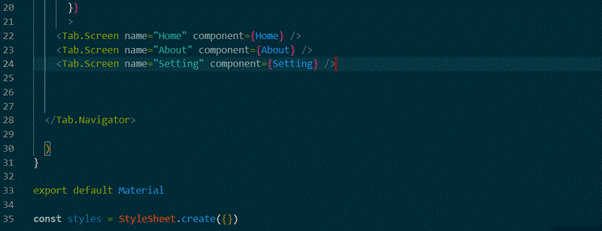
Image 6
Now, add the three screens under the Tab. Screen element. Consider image 6.
Lastly, export the Material component.
Code for the App.js file

Image 7
For the App.js file, the code syntax is shown in image 7. Import the Material and NavigationContainer components from ./Material and @react-navigation/native respectively.
After framing the codebase for all five files, you have to check the program on the emulator.
How to execute the program
You have to execute the codebase in your emulator to check whether the top tab navigator has been built or not.
Open the command prompt and type (cd Your Project name). This will let you enter the project. Then run npm install and after that type npx react-native run-android.
Refer to the project output as shown in image 8.
Image 8

Your navigator at the top panel has been created. You can switch to different screens available at the top panel.


Leave a Reply