

So, you’ve just installed your Linux server and you are preparing to start installing packages and hosting various packages. Well, not just yet. A few steps are quintessential in fortifying your server and ensuring that your user experience runs smoothly without any hiccup. In this guide, we take you through a step-by-step procedure of how you can set up your Linux server.
Step 1: Update & Upgrade your Server
By the time you are installing your Linux server, chances are already there are newer versions of software packages available from their official repositories. It’s therefore thoughtful to first consider updating the package list of packages already installed on your system.
To update the package list of packages residing on your Server, log in as root user and run the Linux commands as shown below
# apt update ( For Debian & Ubuntu)
# yum update ( For RHEL & CentOS)
# dnf update ( For Fedora)
After successfully updating the package lists, upgrade the software versions installed to the newer and latest versions by running the Linux commands:
# apt upgrade ( For Debian & Ubuntu)
# yum upgrade ( For RHEL & CentOS)
# dnf upgrade ( For Fedora)
All the packages on your server are now up to date and you are ready to proceed to the next step
Step 2: Create a regular user and assign superuser privileges
Linux’s best security practices discourage logging remotely as a root user. This is because of the heightened privileges that the root user has and the damage that can be caused if a hacker gets hold of the root password. For this reason, logging in as a regular user is preferred. The user can then be assigned superuser privileges and later switch over to root user to carry out administrative tasks.
To create a new user run the command:
# adduser user
This is followed by a string of questions as shown. Answer appropriately where applicable.
To assign the user root or superuser privileges, run the command:
# usermod -aG sudo user
Step 3: Set up Passwordless SSH login to the server
To make your life easier, you can configure a passwordless ssh login to your server from your remote PC. As the name suggests, passwordless login doesn’t require a password to login to the server. It uses public and private key authentication.
To generate the public and private key pair, issue the command:
# ssh-keygen
Sample output
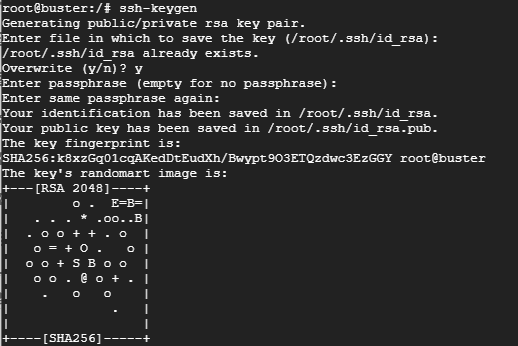
The private key resides on the remote PC while the Public key is copied to the server.
To copy the Public key, run the command
# ssh-copy-id username@server-IP address
The key will be copied in the ~/.ssh/authorized_keys file. The next time you try logging in to the server, you won’t be prompted for a password.
Step 3: Set up a firewall on your server
Linux is considered one of the most stable and secure operating systems in the world. Out of the most distros are much secure than either macOS or Windows counterparts. However, this doesn’t mean that you should overlook the basic security of your server. A firewall is a must-have feature for any security-minded Linux user. A firewall is a service that filters traffic. It either allows or blocks network traffic that is inbound or outbound of the server. This way, unwanted protocols are blocked, keeping malicious traffic from hackers at bay. There are different firewalls that you can configure for various distributions.
For Debian/Ubuntu distributions, we have UFW (Uncomplicated Firewall)
To install UFW run
# sudo apt install ufw
Once installed, you can enable it using the Linux command
# sudo ufw enable
To allow HTTP traffic run
# sudo ufw allow 80/tcp
Wrapping up
In this guide, we have highlighted some of the basic steps that one needs to make to boost their Linux server’s security and enhance the day-to-day server operations.